Tuesday, December 31, 2013

GOODBYE 2013 ...... WELCOME 2014 ....

We sit on the eve of a New Year ..... Full of possibility and expectation.

I for one am glad to see the back of 2013. For our Family it has been the worst year I can remember. We know unemployment too well. We've experienced just how ugly human beings can be, even those from whom we least expect it. We as parents have guided our children through betrayal and bullying, and we've dealt with issues, we never expected we'd ever have to. I've sat under a heavy, dark and oppressive cloud for most of this year. It's honestly the closest I have ever come to just giving up.

Highlights have been few, but there have been some.  For me THE highlight of this year, was being able to spend a month back home with my family. To take in the sights and sounds of a land so familiar, and just stop and breath, was food for my soul.

I've spent a lot of time over this Holiday period thinking. Thinking about how best, to climb out from underneath this heavy, dark and oppressive cloud, regardless of the situations we find ourselves in. The answer I've come up with ..... To intentionally look for the positive in each situation we find ourselves in, no matter how small it is. So, this is what I've resolved to do .....
- At the end of each day, I'll find something positive to focus on, and be grateful for.
- I want to grow in my faith.
- It's time to put me first sometimes (and I've realized it's OK to do that). I intend to learn how to say "no"!!!

So I pondered on how best to keep up with all of this ....... Journal !!! (Yes, y'all knew that I'd throw something crafty into this mix !!!). I have created 4 journals, that now live on my nightstand, together with a cute pen pot, filled with fun pens and stationary. They're labeled, and at the appropriate time each day, I'll write my thoughts into each one. Nothing long winded, just a short little something that reminds me to look for, focus on, and be thankful for the positive things each day.
I used 6" x 6" hardcover sketch books that I got at Hobby Lobby. I prettied them up with scrapbook paper, and some quotes I found and liked. I think they'll fit the bill :-)


I've also taken on the challenge of doing Project Life this coming year. I thought about it last year, but decided to look over other peoples work during the year, and then decide whether or not I thought it was doable. I'm excited to get started. It was my Christmas present from Hubby.


I think it'll be wonderful to look back, this time next year, and see just how much our little family accomplished. One of my little journals is for me to jot down day to day happenings, so that when I get to the end of the week and work on the weeks layout, I don't forget any of the finer details.

All that's left to do now, is wish you all a Happy New Year. May 2014 be full of love, laughter and dreams come true. Thank you for taking the time to stop by my blog for a visit this year, and for all your sweet comments and kind words - I appreciate it more than you know.

Friday, December 13, 2013

CHRISTMAS COOKIES ....

What would Christmas be, without the opportunity to put on that apron, pull out a cookie recipe or two, and bake? Christmas Cookie baking, ranks right up there, as one of my favorite Christmas activities. I bake tons, all through the year, but Christmas Cookies are - well - just special !!!

Our Middle School PTA hosts a Staff Cookie Exchange each Christmas. Parent volunteers bake cookies of every shape, size and variety, and the staff members get to choose a dozen to take home to their families. It's a sweet idea, and a nice way for us to show our appreciation for all that these people do for our kids.

So yesterday was the day ..... flour flew, butter was beaten, and boy, was it fun. Both recipes I used were new to me, and both were extremely delicious !!!
First up ..... Decorated Sugar Cookies.
I used a recipe that called for 1/4 cup Almond Paste ....... Absolutely the best sugar cookies I've ever made !!! I kept it simple ...
 
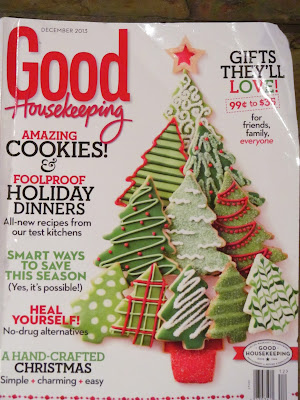
This magazine cover was my inspiration ...... Simple, but gorgeous at the same time.
I had 3 different Christmas Tree cookie cutters. I used 3 different colored green icing colors, and I used white and red as my accent colors. The result ..... A Christmassy feast for the eyes ...


Such Christmassy perfection.

My second contribution - Peppermint Cookies .... Hmmm, how would I describe these .... quick, easy, no bake, and the closest thing I've ever tasted to Girl Scout Thin Mint Cookies.
Even the non bakers amongst us could make these, they're THAT easy.
Here's what you do ..... Melt Andes Mint baking chips, Drop Ritz Crackers into the melted chocolate, and coat them. Place on a baking tray in the fridge for 10 minutes until the chocolate sets. Melt a little white chocolate, crush a peppermint candy cane or two. Drizzle white chocolate over cookies and sprinkle with crushed candy cane. Return cookies to the fridge for a few minutes to set again. Enjoy !!!! You see, I told you they were easy !!!

As the big day approaches, I will get a second opportunity to bake .... this time it'll be for us, and our neighbors. It's sure to be fun !!!

Saturday, December 7, 2013

CHRISTMAS CANDY GIFTS ....

These would be great gifts for your neighbors, teachers or mail carrier. They're cute, quick to make and inexpensive.
As I mentioned in my previous post, these were all made for the Christmas Faire I was taking part in tomorrow, but as a result of Icemeggedon (that is how infrequent events like this happen in Texas), the Faire has been cancelled. It's the right call .....roads are treacherous, and we couldn't even get out of our driveway if we wanted to.
So I'm here today to share these cuties with you, and maybe spark some of your creativity.
All of these ideas came off pins I'd seen on Pinterest. I just worked with what I had (paper punches, Cricut cartridges and good old cardstock and scissors !!!), to create my version of what I'd seen.
 These are my Hot Chocolate For 4 Santa Boxes. I filled each box with 4 sachets of hot chocolate, 4 peppermint candy canes and 4 marshmallows. The box only required one 12" x 12" piece of red cardstock to make. I fiddled around with the dimensions and shape, until I was happy with it. I finished it off by decorating it to look like Santa's belly !!! The little dangling mug, I turned into a gift tag.
 Next up, Santa and his Snowman sidekick !!! The Santa is a Dove Milk candy bar, and the Snowman is a Hershey's airy, bubbly bar.
 Santa Rolo tube, and Santa candy cane.
Believe it or not, this is constructed, box and all, using just one 12" x 12" piece of cardstock, that I cut to size. The acetate for the window came from an old chocolate box. Again I just fiddled around with the dimensions and construction method, until I was happy with it.

If anyone wants me to write up my dimensions and construction method for either of the boxes, just let me know. I'd be happy to oblige.

Until next time ....... Keep crafting !!!!

Friday, December 6, 2013

OH BABY, IT'S COLD OUTSIDE ......

I've always been told that it seldom snows in Texas ....... Well it certainly came down last night.!!! Not snow but ice !!!
Schools are closed today (always a happy day in our household), and what was to be a jam packed busy weekend, has become clear. We'll all be spending the weekend house bound, as the ice is thick and treacherous. We wont see temperatures above freezing , until Sunday afternoon, and then only briefly, before they plummet below freezing again for the night.
 There's no denying it's beautiful .... This is the view from our front door.
 The holly bushes, are clothed in their icy, winter coats.
The ice is piled high (above the window sills in some places). This ice pile must be at least two and a half feet deep.

We were to have a community Christmas Bazaar this weekend, which I've been busily making items for, for a while now. That has been cancelled ....... I have a lot of Christmas items hanging around now !!! Oh well, that's the way the cookie crumbles I guess :-)
As soon as I get a moment, I'll take some pictures, and write up a post ....... there are some very cute and affordable gifts you may like to try for yourself.

Until then ..... We'll be trying to keep warm :-)

EDIT: I just had to add these pictures I took later today (I'll need to remind myself of this, when we're sweltering at 110 Deg 6 months from now !!!) ....... It's 10:23pm, and I've just stuck my head out of the front door ....... It is sooooo cold, I could barely even catch my breath !!!
 Ice piled high ...
 We did our Family Christmas Card photo shoot ....
 The ice cast of a leaf ...... have I mentioned that I find ice absolutely, exquisitely, beautiful ...
 Frozen down spouts ...
And Mom's solution to the cold ..... Hot chocolate, complete with whipped cream and sprinkles !!!

Saturday, November 30, 2013

FORREST TOWN ...

Once again it's been a while. All of my good intentions just seem to fall by the wayside at the moment.

I'm sure nobody needs reminding, that Christmas is just around the corner .... Closer than we even imagine !!! Today I finished up the Christmas gifts for my niece and nephew. Come Monday, they'll be wrapped and stamped, and on their way.

Now if you have a little man in your life, that you want to make something for, here is a sweet idea. It really didn't take me too long to put together either.
I found these little wooden cars in the Dollar Spot of Target about a year and a half ago. At the time my nephew was little more than a newborn, but I loved them, and knew that he'd eventually be big enough to enjoy them. Wow, how time flies, as that time has now arrived ...

I browsed the wonderful world of Google ..... Yes, and Pinterest too, for some ideas, as to what I could put with them. I came upon town after town of toy car playmats ...... Perfect !!!! I had most of what I needed on hand ... felt, and more felt. I did decide to use green wool felt (as opposed to acrylic craft felt) for my backing mat. I just preferred that it's more durable. After a spot of town planning, Forrest Town was born.
It has most of what you'd need in a town ... the have to haves and a spot for recreation. I elected to sew the pieces down, and not just glue them, as was suggested on some of the posts I read. I want this mat to be able to stand up to the antics of a nearly 3 year old "real" boy :-)
I figured he'd need a "garage" to keep all of his cars in, so I made a little drawstring bag. That way, tidy up time should be quick.
Good old duck cloth ..... tough and durable. A piece I had left over from another project.
To finish the mat off, I backed it with the same duck cloth, and bound all of the edges.
My sister and her family are soooo lucky - they're going home to spend Christmas with my folks and all of our family (yes, it is the green glow of jealousy you can see .... It'll just be the 4 of us, on our own again :-(  Hopefully this gift, will get lots of use. It's small and portable enough to be packed in a bag and pulled out when the little people want to play.

Time now, to pull out my knitting needles, and put the finishing touches to another one of the Christmas gifts I'm making.
Hoping you're Christmas Gift making is bumbling along at a steady pace ,,,,,, Remember, Christmas will be here before you know it :-)

Friday, November 8, 2013

FEEDING OUR FEATHERED FRIENDS ....

We love birds ..... back home, Hubby and I belonged to the local Bird Club. We have a Life List that doesn't look too shabby either. Moving countries ...... growing kids ...... Well, we just don't have much time to do it anymore. Perhaps when we retire one day, we'll be able to spend more time with our feathered friends.
We do have numerous birdbaths and bird feeders in our garden though, which the birds (and squirrels) frequent. We have them placed, so that when we're busy in the kitchen or study, we can see the comings and goings at these feeding stations.
Over the years, I've seen tutorials for seed rings pop up, but I've never ever tried them myself. 2 weeks ago, I decided to give it a try ..... I pulled out the donut pan from the Goodwill pile (Sorry Goodwill, I'll be keeping that pan), and got to it. I used  THIS tutorial.


Success !!!
They were really easy to make. I doubled the "recipe", and manged to make 6 of this size seed ring. Be warned ..... they do take a while to dry out properly. We have had some very wet weather here recently, so that probably didn't help. When I make my next batch, I'm going to hang them in the garage to dry out completely.
The best part is, the birds LOVE them !!! This is the scene outside one of our windows at the moment ....


With winter fast approaching, food will be more scarce for the birds ..... even more reason to make sure you have some treats scattered around your garden for them.
I'll definately be making some more of these ....... in fact, I want to make some, and package them in a pretty box, as Christmas gifts for some of our bird loving friends ..... The gift that will keep on giving !!!!

Tuesday, November 5, 2013

CANVAS TOTE BAGS ....

Shewww .... time is passing by so fast !!! Nearly 2 weeks, since I posted anything. I'm back now though, with some canvas tote bags to show you.

The Elementary School that my kiddos went to, is holding a Boots & BBQ fundraiser this Thursday. One of the attractions they're having is an Old Country Store (think Cracker Barrel). They asked me if I'd be able to donate anything. This little school is very near and dear to my heart. My kids had THE best elementary school experience, full of memories (and jam packed scrapbooks .... we took A LOT of pictures through those years), that they'll take with them through life, so I was more than happy to pitch in, and give a little something back.

Here's what I came up with ..... Yes, it's that freezer paper again !!! You REALLY should give it a try :-)


 I made sure they all had 3 things ...... paint, embroidery, and bling !!!
They are all lined with a coordinating (but fun) lining.
I hope that they make a little money for the school.


This is the the little Care Card I made to go with each one. The reverse just has the washing, drying and ironing instructions on it.

Thanks for popping in to visit .... I really do appreciate it.

Thursday, October 24, 2013

HOMEMADE CHOCOLATE ECLAIRS ....

Ladies (and gents if you're reading), put down what you're doing NOW ...... Run to the kitchen ...... put on your aprons .... and get baking !!!
Can you tell I'm just a little bit excited ? I've tried on numerous occasions to make these monsters ..... it has NEVER worked. Today, I thought I'd give it a go again ..... I am so ridiculously happy and excited about how these turned out ..... I may just have done a little happy dance !!!


Perfect ...... just perfect !!!! Light, airy, crispy, golden brown ...... oh I cant wait for dessert time tonight !!!
THIS is where you'll find the recipe .... these will surely earn you LOTS of brownie points with your family :-)

Friday, October 18, 2013

A DAY AT THE FAIR ....

I had pretty much resigned myself to the fact, that we weren't going to get to the Great State Fair of Texas this year ........ burst water heater, less than ideal weather, soccer games ..... you get the idea!!!
Then today, on the spur of the moment, after finding a great deal on the tickets, Hubby and I decided to go for a couple of hours. It was a lovely way to spend a few hours, just Me and My Man . Like most people in our stage of life ..... growing kids, homework, sports commitments .... we don't take nearly as much "Us" time as we should.
It was a fabulous day ...... not crowded, the perfect weather .... just lovely !!!


Of course there's Fair Food ...... the must haves, and the competition winners, that although some of them seem a little dodgy, beg to be tried.


 Funnel Cake was Hubby's must have. Mine was a Fleishmanns Corn Dog (coated liberally in ketchup and mustard)...... the only time I'll ever touch one of those things !!!


The winner of The Most Creative Fried Food for this year, was fried Thanksgiving Dinner. Truth be told, we were skeptical (very skeptical) ..... Of all the winners I've tried over the years, this wins hands down, it was DELICIOUS !!! The presentation of it was super cute too ....... Little pots of gravy and cranberry sauce and a Thanksgiving napkin.


We got to see the items I'd won ribbons for displayed .... this always gives me a warm, fuzzy feeling :-) There is a wealth of talent around - there were a lot of wonderfully creative items on display to see.


We love visiting the livestock enclosures ...... this porker was HUGE !!! He is only 4 years old. The sign board next to him, said that he has about 1100 lbs of bacon on him ........ not to worry though, he is a breeding pig :-)


 If you've been a visitor to my blog for a while, you might remember that the day after I visited the Fair last year, Big Tex (The talking State Fair Mascot), had an electrical fault, and he burned to the ground ...... let me tell you, it was a sad day for these Texans. Anyhow, at great cost, work began on a new Big Tex (yes, he does have a fire extinguishing system in him now) .... the promise was made to Fair goers, that Big Tex would stand tall and preside over State Fair 2013 ... they made good on their promise, and here he is. He's quite a handsome chap ....


And just look at those snazzy boots he's acquired  ..... Only in Texas !!!!!
Next week, we'll go and collect my entries and ribbons, and Texas State Fair 2013, will be over. Around May, the Creative Arts Department Competition Guidebook will arrive in the mail, and the cycle will begin again :-)

SIDE NOTE: Megan W was the winner of my Giveaway !!! Megan if you'll email me                   (kerry_james@verizon.net) you mailing details, I'll get your package off to you.

Thursday, October 17, 2013

WE HAVE A WINNER !!!!

Oops .... October 15th came and went, and I lost track of the days !!!
Better late than never ....
My Random Person Picker (aka My Hubby) pulled a name out of the hat, and the winner of the little voodoo doll pincushion, and a few other surprise goodies is .....

MEGAN W
Congratulations Megan, please email me (kerry_james@verizon.net) with your mailing details, and I'll get your goodies off to you.A big thank you to everyone that entered, it was a fun thing to do, and I'm sure there'll be more giveaways in my bloggy future.

Friday, October 11, 2013

THE WHITE RABBIT GONE WILD !!!!

Some of you may remember from a few posts back, that I took part in Val's Halloween Zombie Doll Swap (this is a favorite swap of mine). I made The Mad Hatter for my partner. She came up with this great idea ... she offered up the challenge, to any of us who wanted to play along, to make another zombie doll, for ourselves this time.
I had everything I would need on hand, and I don't have many of my own creations, so I was in. I had wanted to possibly make The White Rabbit for my swap partner, but chickened out, because there were too many elements I'd have to experiment with ..... ears, different shaped head.... I took this as my opportunity to give it a go .... if it went wrong it was mine, so nobody would be dissappointed.


His head begun to take shape. I used an egg shaped styrofoam form for his head. To make his ears, I wrapped tin foil around a wooden skewer, until I was happy with the shape. I then molded some paperclay around the ears, before jabbing the skewer into his head. I then carried on molding more paperclay, so that his head looked like one piece .... no joins.


Next up, was to zombify his head .....
The paperclay had cracked in a few places, so I applied a layer of white tissue and modge podge all over his head  - I love the texture this gives. Once dry, he was painted white. I thought at this point that he looked too white, so I gave him a grey color wash ... this gave an almost antiqued look to him. Knitted I Cord for the "brains" again, and then those two front teeth ..... one of my favorite parts. I made them out of sculpey, molded onto toothpicks. Once they were baked, cooled and painted, I performed an implant procedure.... my dentist would be so proud of the job I did !!!
His body and appendages are made of fabric. I added a cup of rice to his bum .... that just makes him sit beautifully.

 Dressing him ... my favorite part !! Blue overalls and a red shirt, with that oversized bow tie. He couldn't go without his pocket watch either. A good spray over with red fabric spray paint, and he was done.
I am soooo happy with the way he turned out, and even more so, that I get to keep him.
Today, I'll be decorating my little Halloween tree and table .... you can be sure he'll be taking a spot somewhere there.

I'm thinking now, that I'd like to try making some paperclay Christmas characters ..... I'm leaning more towards that primitive look this year. Hmmm, we'll have to give that idea some thought.